

AI Tools 101: HeyGen Guide to Create Talking Avatars and AI Videos
This step-by-step guide shows how to use HeyGen to build digital twins, edit videos, and translate content into 175+ languages without any video editing experience.

Create Product Demos, Training Videos, and Personalized Pitches Without Ever Stepping in Front of a Camera
If you’re a founder, content creator, or entrepreneur, you know the value of showing up on video. But not everyone has time to record, re-record, and edit every time there's a new update or campaign.
That’s where HeyGen comes in. In this edition of our "AI Tools 101" series, we’ll guide you through how to use HeyGen’s Avatar 3.0 step-by-step. From creating your avatar to uploading your voice and generating full-length videos with natural expressions, synced speech, and customizable backgrounds.
Let’s build your digital twin.
Step 1: Create a HeyGen Account
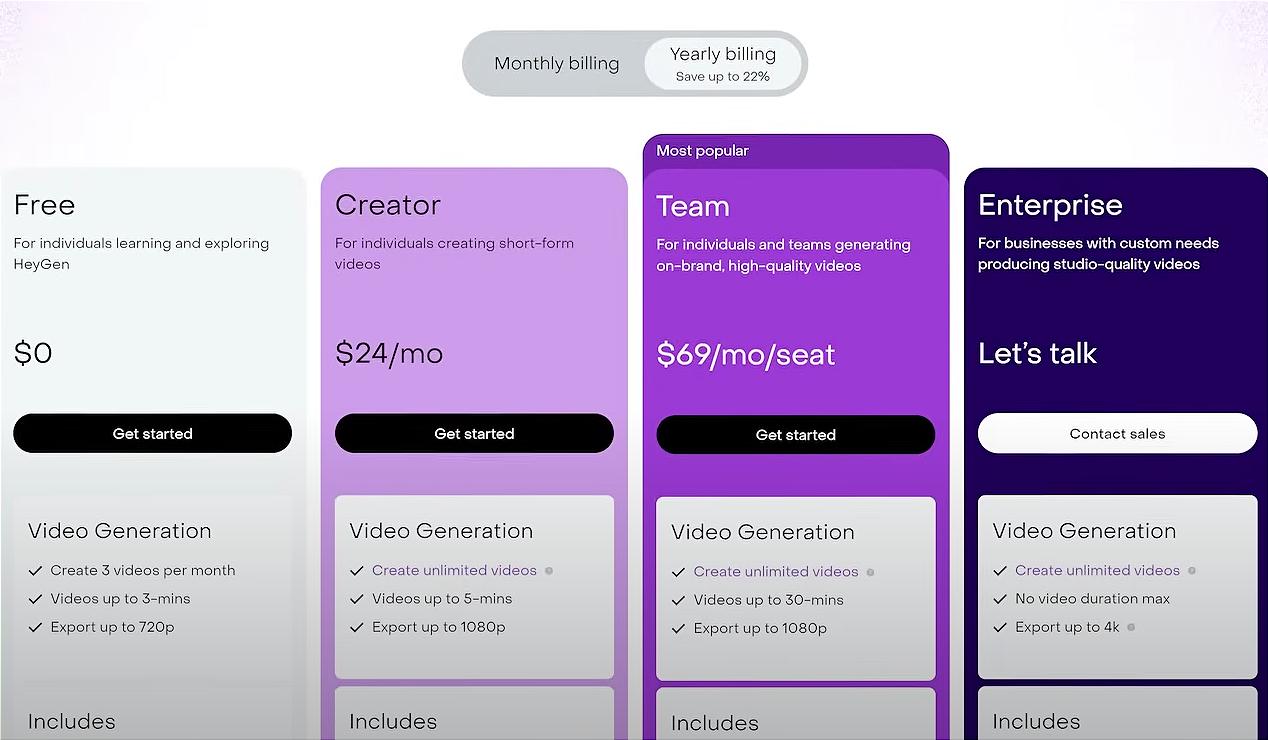
Start by heading over to HeyGen and creating an account. Choose the plan that fits your needs:
- Creator Plan: Allows videos up to 5 minutes in 1080p, access to translation features, and basic avatar creation.
- Team/Enterprise Plans: Unlock higher limits, 4K exports, and scalability for larger teams.
Once signed in, you’ll land on the HeyGen dashboard.
Step 2: Create Your Avatar with Training Footage
Now it’s time to make your clone.
- On the left sidebar, click "Avatars" and choose "Create Avatar".
- Select the Video Avatar option and click "Get Started".
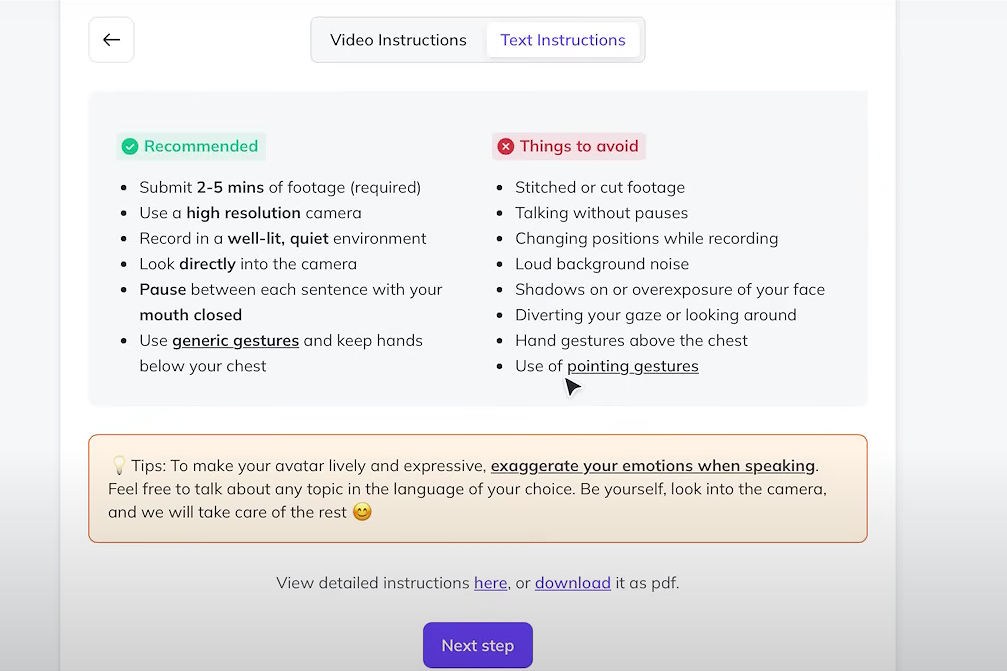
- You’ll be asked to provide video footage of your subject (yourself or someone else, with consent).
What Works Best:
- The subject should look directly at the camera.
- Use a tripod, stable lighting, and a plain background (studio or outdoor is fine).
- Speak clearly with natural hand gestures.
- Include brief pauses between sentences to make the training more fluid.
“Hi, my name is Ameer. I am training the HeyGen Avatar. This video helps create a realistic and expressive digital clone.”
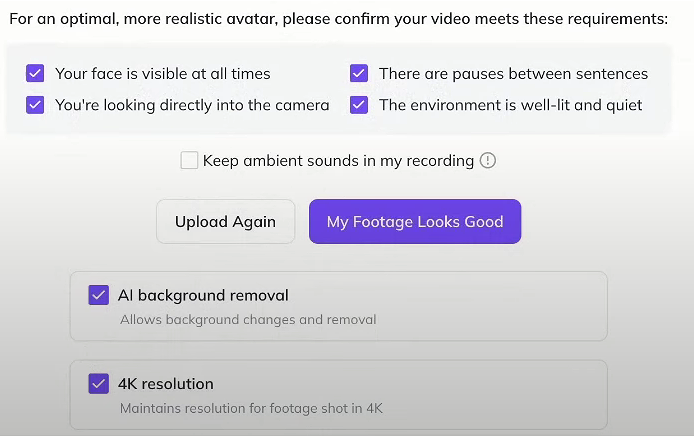
Once ready, upload your training video or paste a Google Drive link. Tick the checkboxes to confirm your footage quality, including:
- Good lighting and framing
- Optional: keep ambient sounds (useful if you filmed in a park, etc.)
- Resolution (4K supported on enterprise plan)
Step 3: Give Consent to Generate the Clone
Before generating the avatar, HeyGen requires consent from the person being cloned:
- Record a short consent video using your webcam
- Or, send a link to someone else to record from their phone
- On Enterprise plans, you can upload pre-recorded consent
This ensures ethical use and legal protection around deepfake technologies. Once submitted, HeyGen will begin generating your avatar. With around 3 minutes of training footage, it usually takes 10–15 minutes.
Step 4: Select and Customize Your Avatar
Once your avatar is ready, go back to the Avatars tab. You’ll now see it listed among your available options.
You Can:
- Select your personal avatar
- Browse HeyGen’s extensive library of professional avatars with diverse looks, outfits, and expressions
- Add up to 100 looks per avatar to cover different environments, tones, and styles
Step 5: Use the AI Studio to Add Scripts or Audio
Click “Create with AI Studio” and choose your avatar. From here, you can:
- Choose between landscape or portrait video orientation
- Add your script in plain text and HeyGen will generate the speech
- Or, upload your own audio clip by clicking the mic icon
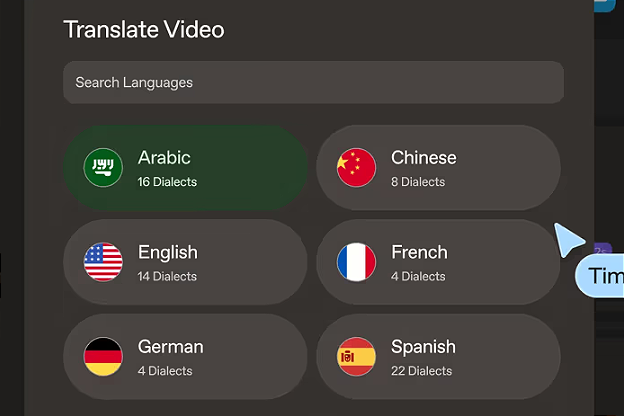
You can also translate your script into different languages with the click of a button.
Step 6: Submit and Generate the Video
When everything is ready, hit Submit.
HeyGen’s AI will:
- Sync the avatar’s lips, gestures, and eye contact to the script or uploaded audio
- Generate your video within a few minutes
- Send you a download link via email or make it accessible in your HeyGen library
Step 7: Review and Compare Results
You’ll now see your digital clone in action. If you used text-to-speech:
- The visuals will be decent, but audio can sometimes feel flat or robotic
- Non-verbal communication is reasonably synced
If you uploaded your own voice:
- The avatar looks more lifelike
- Expressions are better aligned with natural speech
- Intonation and emotion come through far more clearly
Real Use-Cases for HeyGen Avatars
Digital clones are no longer sci-fi. Here are a few powerful ways to use them:
- Training and onboarding content: Replace repetitive sessions with scalable video from your CEO or experts
- Marketing and social media: Create brand tutorials with a consistent avatar
- Personalized video messages: Generate multilingual customer communication at scale
- AI documentaries and storytelling: Use clones to narrate historical or fictional characters
What to Keep in Mind as You Create
While impressive, HeyGen avatars have a few limitations:
- Best performance comes from forward-facing camera angles (not profile views)
- Overly expressive gestures like turning the head too much may not be tracked accurately
- Background noise can affect training results. Use clear audio
- Lifelike as they are, avatars still require well-structured input and context
Final Thoughts: The Future of AI Avatars
HeyGen’s Avatar 3.0 is already transforming video content creation. Paired with tools like ElevenLabs for audio and GPT-4 for scripting, it unlocks:
- Rapid content production
- Scalable training materials
- Creative storytelling with digital replicas
And this is just the beginning. As the tech evolves, we’ll soon see real-time conversational AI avatars interacting on websites, in classrooms, and across digital platforms.
You’re not replacing yourself. You’re amplifying your reach.
Comments ()